The Users module is the control center for identity management within the platform. It allows you to invite new collaborators, define their level of interaction through role assignment, and strictly delimit what information they can view, thus ensuring data security and confidentiality.
Module Access
To access account management:
- Select the Users option (below the “Home” button).
In the main interface of this module you will find a search bar to locate profiles by name or email, a list of registered users (detailing their email, creation date, and editing actions), and controls in the upper right corner to toggle the display between grid or list format.
Creating a New User
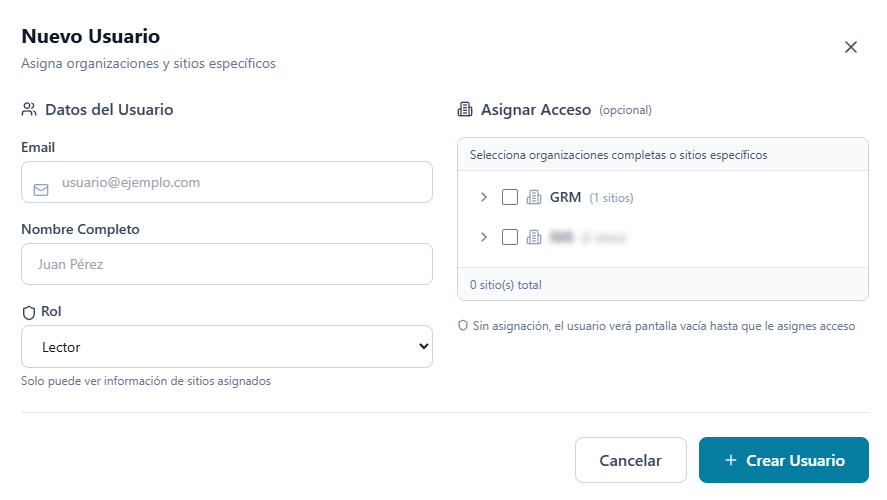
To register an account, click the + New User button located in the upper right corner. This will display a configuration window divided into two operational sections:
- User Data This section defines the identity and hierarchical level of the account in the system.
- Email: Enter the collaborator’s email address. This will serve as their unique identifier for login.
- Full Name: Enter the first and last name to facilitate identification of the user’s actions.
- Role: Select the interaction permission level from the dropdown menu. The role determines the operational capabilities within the platform. For example, a “Reader” profile has modification restrictions and can only view information from sites that have been explicitly shared with them.
- Assign Access (Optional) This section manages the scope of information that the user will have the right to view or edit, operating under the principle of least privilege.
- The panel displays a collapsible hierarchical structure listing the Organizations and Sites available in your environment.
- Use the checkboxes to grant access to entire Organizations or limit entry to specific Sites.
- System Note: This configuration is optional during initial registration. However, if a user is created without any assignment, they will encounter an empty screen upon login until an administrator grants them access to a workspace.
To complete the registration, click the + Create User button. The profile will be saved in the directory and will be enabled to operate according to the defined access and role parameters.